Tunneling Debug and JMX for Alfresco
UPDATE: As of 3.2 sp1 the custom-core-services-context.xml is no longer needed. Check this [updated post][1] for more info. You will also find supplementary instructions on using Windows there.
As we start to see more deployments of Alfresco in the cloud we are also seeing increased complexity in using features like JMX for managing Alfresco and troubleshooting Alfresco customizations with a Java debugger. Below are two ways that you can use to enable both on cloud based installs of Alfresco. These methods can also be used in instances where more security conscious admins have locked down ports, for example in a secured environment. Also note these methods require an ssh client on your client machine and an ssh daemon on the server. The instructions provided below assume you are using Linux on the server (which is likely to be the case for most cloud based installs); your client may run Windows, OS X or Linux. Windows clients will require using ssh clients as provided by [cygwin][2] or [Putty][3], etc. Cygwin will allow you to use the following as described. For putty, use this description of [tunneling with putty][4] along with the configuration instructions that follow.
SSH Tunneling for Debugging
First configure Alfresco/Tomcat to listen for debug connections as per usual. Add the following to your alfresco.sh file:
export JAVA_OPTS="${JAVA_OPTS} -Xdebug -Xrunjdwp:transport=dt_socket,server=y,suspend=n,address=8082"
The address parameter sets the port you want the debugger to listen on. Adding this line, will require you to restart Alfresco/tomcat for it to become active.
Next, standard port forwarding with ssh should enable Java debugging:
ssh -i path/to/your.pem -f root@yourhost.com -L 2000:localhost:8082 -N
In this example we are using the following options:
-i path/to/your.pem If you are using key-based authentication, like with EC2, use this option to point to your private key. It is optional if you are not.
-f Have the session move into the background after you connect. Useful if you need to enter a password or passphrase
root@yourhost.com The user and name of the server to connect to. You do not need to use your root user account.
-L 2000:localhost:8082 The first number is the local port that you want to open to listen to connections on. Next is the hostname/IP/DNS name of the server to connect to on the other side of the tunnel and then finally the port to connect to at that address.
-N tells ssh to not execute a command upon connection
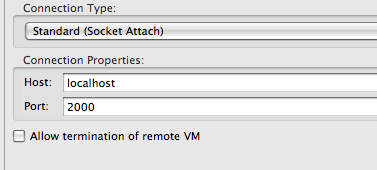
Next we need to connect the debugger. This example gives instructions for Eclipse. Configure the debugger using the Remote Java Application option. Accept the default Connection Type: Standard (Socket Attach), but for the Connection Properties enter localhost for the Host and the port number from the first parameter in the -L switch for Port. In our example port 2000.
Eclipse Debugger
Connect your debugger.
SSH Tunneling for JMX
This configuration is a bit more complex due to how RMI works.
First, you will need to add the following line to your alfresco.sh file (Restart required to turn in on):
export JAVA_OPTS="${JAVA_OPTS} -Dcom.sun.management.jmxremote=true -Djava.rmi.server.hostname=dummyhost"
You may already see the -Dcom.sun.management.jmxremote line in the file, if so just add =true to it. This is important as I’ve had difficulty attaching with out this set to true (even though the default value of that option, with out declaring the value is true).
The -Djava.rmi.server.hostname=dummyhost option is needed to help RMI know where to connect. RMI connects in a two part process. First by connecting to the RMI server registry, which pushes your request to the JMX service which is dynamically allocated on the first open port available to it at start up time. Dynamic ports don’t give us the consistence we need so we will want to configure Alfresco to use a static port. Also, this second connection requires us to use/set a hostname to connect, otherwise it will return an IP address, which in the case of EC2 is non-routable.
Let’s create a new context file under the extension directory (tomcat/shared/classes/alfresco/extension) and call it custom-core-services-context.xml. In that file we will add the following:
`<?xml version=’1.0’ encoding=’UTF-8’?>
<!DOCTYPE beans PUBLIC ‘-//SPRING//DTD BEAN//EN’ ‘http://www.springframework.org/dtd/spring-beans.dtd’></p>
</beans>` The important value in here is `jmx.port.number`. To set this value add `jmx.port.number=50508` to the `alfresco-global.properties` file (located in `tomcat/shared/classes`) Next you will want to add the hostname you entered above into your `/etc/hosts file`: `127.0.0.1 dummyhost` Remember we do this because during the second part of establishing an RMI connection, RMI returns the hostname we want to connect to. In our case this is the local client that is forwarding the connection to the server machine that is running Alfresco. Now start Alfresco and let’s configure ssh to forward the ports. This requires two new tunnels: `ssh -i path/to/your.pem -f root@yourhost.com -L 2001:localhost:50500 -N` `ssh -i path/to/your.pem -f root@yourhost.com -L dummyhost:50508:localhost:50508 -N` The same explanations to these commands found in the debug section above apply here as well. But notice one difference in the second tunnel. The second tunnel is specifying the hostname to connect to: `dummyhost`. Remember we are doing this because RMI will be returning the hostname as specified in our `alfresco.sh` file. We need to tell the tunnel how to use that hostname. Also, the port we want to have listening locally is the same as the port that will be listening remotely. Finally, when you connect your JMX console to Alfresco use the standard connection string but for the hostname use `localhost` and the port number, `2001`, specified in the first tunnel: `service:jmx:rmi:///jndi/rmi://localhost:2001/alfresco/jmxrmi` [1]: http://jared.ottleys.net/alfresco/updated-tunneling-debug-and-jmx-for-alfresco [2]: http://www.cygwin.com/ [3]: http://www.chiark.greenend.org.uk/~sgtatham/putty/ [4]: http://www.cs.uu.nl/technical/services/ssh/putty/puttyfw.html
<bean id="serverConnector"
depends-on="registry"
lazy-init="true">
<property name="objectName" value="connector:name=rmi"/>
<property name="serviceUrl" value="service:jmx:rmi://localhost:${jmx.port.number}/jndi/rmi://localhost:${alfresco.rmi.services.port}/alfresco/jmxrmi" />
</bean>